Pages

Monday, April 16, 2012

Interior Finishing Touches and Bunk

This weekend I spent finishing up and cleaning the inside of the camper and completing the bunk bed.  This will room for another person to sleep, can be used for storage during the campout and will allow me to push the bedding back underneath and put the table up.


I put the electrical cover back on and added the 1/4 round along the back.


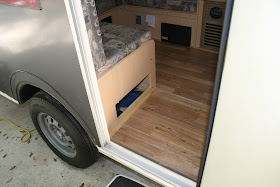
View of the new bunk bed.  Every piece can be removed in and out easily (nothing permanently affixed.)

Bed is in two pieces for easy set up and removal. Covered in batting and fabric for comfort. 

I added the same outdoor Berber carpet that I used for the back panel under the sink and fridge. 


Kitchen

Removed the extinguisher holder and will secure that elsewhere.  This creates an access to the storage under the seat for shoes etc.  I will finish the cut out with trim later.


The kickplate was re-secured as well. 


Monday, April 9, 2012

Floors Done and Back Aluminum Panel Affixed

Remembering the day we brought her home.

The new floors are done with the quarter round affixed.  I still need to figure out what to do with the electrical wheel well and under the sink.


Next the back panel was fitted with wood slats....

 ...and thermo ply foam for insulation and to create a flat surface, flush with the sides, that we could affix the back aluminum panel to.


Here the bumper is lined up and roof trimmed so that the roof will overlap the back bumper as opposed to under lapping like when I bought it.

Monday, April 2, 2012

The roof has been replaced and floors going in!

The back panel has been caulked and a hole cut for the electrical.

This roof is aluminum, whereas the old roof was a sort of really thin fiberglass.
The hope is that this new aluminum roof will be much stronger.

A moisture barrier was stapled down and each staple hammered in to be flush with the side wall, the roof then glided over the moisture barrier.


A hole was pre-drilled for the gas exhaust in the front by using the old roof as a template.
A layer of butyl tape and silicone caulk was then added to the trim.  The trim for each side was done in alternating screws to ensure the roof didn't shift to one side.

And here is the new roof!  Next up, a bit needs to be trimmed in the back and the roof vent must be mounted.

 I began putting the flooring in - a layer of thin thermal barrier and then linoleum that looks like wood.  I chose to do the linoleum for the weight (lighter than actual wood) and its insulation properties.

This back area hasn't been glued down yet but has been cut.

The main cabin floor was glued down with liquid nails.


I began measuring and cutting the trim with a chop saw.